Saturday, May 7, 2011

The shoulder joint is a complex formation of bones, muscles and tendons and provides a great range of motion for your arm. However, a downside to havi

The shoulder joint is a complex formation of bones, muscles and tendons and provides a great range of motion for your arm. However, a downside to having this extensive range of motion is that the shoulder joint is more vulnerable to injury.

If you have ever heard a popping sound or felt a sharp pain in your shoulders while weight training then this is a sign a shoulder injury commonly called a rotator cuff tear or shoulder tendonitis. Basically it is a tear or strain in the rotator cuff muscles and tendons.

The tendons of the rotator cuff muscles receive very little oxygen and nutrients from blood supply. This lack of blood supply is the reason why a shoulder injury can often take a long time to heal. This is also why shoulder problems are common in elderly people. The lack of blood supply makes the shoulder joint more vulnerable to degeneration with aging.

The prevention of shoulder injuries comes down the conditioning of the shoulder muscles and tendons, which ultimately involves both stretching and strengthening of the shoulder joint. Warming up properly before your workouts and lifting weights that you are capable of handling with good exercise form will go a long way to help prevent shoulder problems.

Even if you don't have any shoulder problems now, the following rotator cuff strengthening exercises could save you from major problems in the future.

The exercises described below will help strengthen the muscles of your rotator cuff, they should not cause you pain. If the exercise hurts, use a lighter weight or just use the weight of your arms. With rotator cuff exercises you are training a small muscles so you do not have to train them heavy. Use light weights, high reps, and slow controlled form for all rotator cuff work.


Shoulder / Rotator Cuff Warm Up Exercises Demonstrated On Video


Awesome Forearm Exercise


Best Forearm Exercise


Forearms are rarely, if ever, prioritized in a training routine. If anything most people simply toss in a couple light sets of wrist curls at the end of their workouts. But serious forearm training could be the key to success in breaking through training plateaus and/or taking sports performance to the next level. Regular forearm training can also help prevent injuries such as carpel tunnel syndrome and elbow tendonitis (i.e. tennis elbow).

Here is a great forearm exercise that you can do in the gym. All you need is about 7 feet of rope and a thin strip of rubber about 10 inches long and 2 inches wide, an old bicycle tube or something similar would be ideal.


Fat Bar Wrist Roller


  • Set an Olympic barbell in a rack so the barbell is approx. shoulder height.

  • Place a 45 lb. plate on one end of the barbell, this will balance out the weight and prevent the barbell from tipping.

  • On the other end of the bar wrap the strip of rubber around the middle of the sleeve of the Olympic barbell.

  • Tightly tie one end of the rope around the strip of rubber. The rubber is used to keep the rope from slipping on the barbell.

  • Tie the other end of the rope to a dumbbell.
  • You now have an excellent thick bar wrist roller set up. The thick end of the Olympic barbell will work the forearms and grip a lot harder compared to a thin handled wrist roller. And because the barbell is supported in a rack you can focus 100% on working the forearms. Rather then having to hold the weight out in front of you like in a traditional wrist roller exercise.

    You will need to use some chalk in order to get a good solid grip on the smooth barbell sleeve. Next time you're at the gym, give this exercise a try.


    The King Of All Upper Body Exercises

    Okay, so you’re looking to pack on some serious muscle mass, right? You want to build a ripped, rock-solid physique that demands respect and turns heads everywhere you go, correct? Good. In this article I’m going to talk to you about one single exercise that will help you achieve that powerful body quicker than you ever thought possible.

    No, it’s not a bench press or a barbell curl.
    It doesn’t involve cables or chrome machines.
    You won’t need a swiss ball or any other fancy gym gadgets.

    All you need is a good old-fashioned barbell and a flat surface. Load the bar with as much weight as you can handle and pick it up off the ground while keeping your back straight. Sounds simple enough, right?

    I’m talking, of course, about the undisputed king of all upper body exercises: the deadlift. If you’re looking to pile as much lean muscle mass onto your frame as humanly possibly in the shortest period of time, the deadlift is your best friend in the entire world. That’s the good news. The bad news is that deadlifts are without a doubt one of the most painful and discomforting exercises you will ever come across. When performed properly, they’ll leave you lightheaded, nauseous, gasping for air and will temporarily have you wishing that you hadn’t come to the gym in the first place. But if it’s serious results that you’re after, this is the price you must pay.

    Dead Lifts

    The deadlift will work you from finger to neck to toe. It is a raw, basic power movement and will literally stress every single muscle in your entire body to some degree. The main areas of stimulation are the back (lower and upper) and thighs, but once you start deadlifting on a consistent basis you’ll see gains just about everywhere. The high intensity nature of this basic lift will also force your body to secrete higher amounts of powerful anabolic substances such as testosterone and growth hormone. This causes what is known as a "spill over effect", and will result in new, total body size and strength gains. For example, after a few weeks of heavy deadlifting you should notice that your other lifts, such as the bench press and barbell row, will suddenly increase.

    There a few different variations of the deadlift, but in this article we’ll focus on the basic, standard bent-legged version. Let’s go over the proper technique...

    Position your feet about shoulder-width apart and grip the bar with your hands just outside your legs. You can either hold the bar with an overhand grip or with one palm facing in and one palm facing out. Choose whatever grip is most comfortable for you. Start the movement in a squatted position with the bar close to your shins. With your back flat, abs tight and head looking up, lift the weight off of the ground by driving upward with your legs. Pull the weight up until you are in a standing position. Now lower the weight back down by following the same path as when you lifted it. Rest the plates on the ground briefly, regroup, take a deep breath and pull the weight back up again. Continue the lift until your legs reach muscular failure or until your form starts to slip.

    Maintaining proper form is of high importance when performing deadlifts. You should be able to handle a reasonable amount of weight here, and this increases your chance of injury. The most important thing to remember is to keep your back flat at all times and to keep the weight close to your body. Keep your abs tight as well as this will minimize the stress on your lower back. Practice this lift with light weight in order to get the form down before you start going heavy. You may also find it useful to use lifting straps when performing deadlifts, as this will prevent your grip from giving out before the rest of your body does.

    I recommend performing deadlifts once a week for 2 all-out sets to muscular failure. How many reps should you perform for each set? Well, deadlifts are such an incredibly effective exercise that they’ll work no matter what rep range you use. My suggestion is to stay in the range of 4-8, but some people go as high as 20. Experiment and see what works best for you.

    Treat your deadlifts with respect, and be prepared for the gains of your life!

    You Ain't Squat 'Till You SQUAT!

    The Truth About Building Muscle is a complete step-by-step muscle-building system that is jam-packed with valuable information, covering some extremely important topics such as workout structure, proper nutritional techniques, efficient and cost-effective supplementation, injury prevention, cardio and fat loss as well as many other useful subjects. All of this information is combined into a 250-page, picture-filled, instantly downloadable e-book.
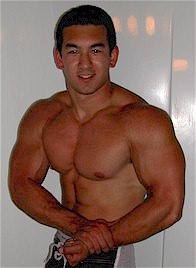
    Sean Nalewanyj
    Sean Nalewanyj

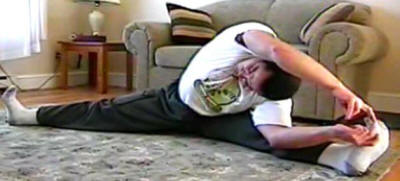
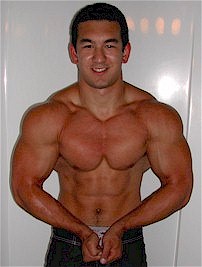
    To learn how Sean went from a skinny 125 pound pencil-neck to the buff guy at the top of this page and then check out: The Truth About Building Muscle


    You Ain't Squat 'Till You SQUAT!

    By Sean Nalewanyj


    Simply put, squats are the most difficult, intimidating and painful exercise you could possibly have in your arsenal. They require massive amounts of discipline and willpower to perform correctly. After you have performed a set of squats to failure, you'll know exactly what I'm talking about! They are also a challenging exercise to master from a technical standpoint. All this aside, they are also the most productive. Squats have packed more muscle onto skinny frames than any other lift out there. Because of the degree of difficulty, squats also force your body to release higher amounts of important anabolic hormones, such as testosterone and growth hormone, thus resulting in total body muscle growth. In addition, squats also cause what is known as a "spillover effect": a strength gain in almost all of your other exercises. When I started squatting to failure, my bench press increased by 20 pounds! If you're looking for serious muscle gains and you don't already squat, you'd better get started. Quite simply, they really, really work.

    Unfortunately, many people have yet to experience the benefits of heavy squatting. Why? It seems that people will come up with just about any excuse they possibly can in order to steer clear form the squat rack. How many times have you heard the all too common "They're too hard on my knees", or "I heard they stunt your growth." What do I say to that? Nonsense! With the exception of a very small population of lifters, everyone can squat! The main reason that the squat rack seems to collect dust faster than any other piece of equipment in the gym is simply due to the amount of intensity one must generate in order to squat effectively. In addition to that, many myths have come up over the years that have convinced people to steer clear of this exercise. Let's take a look at these myths and clear them up once and for all.

    #1: "Squatting will ruin your knees"

    Just as the muscle tissue in your body strengthens when exposed to stress, the tendons, ligaments and other connective tissues in your body will also thicken in response to weightlifting. Because of this, heavy squatting can only increase knee strength. By strengthening the supporting muscles around the knee, you will also end up with much greater knee stability and strength. Knee problems when squatting will only occur through improper form, namely relaxing in the bottom position. When you relax the knee joint, it separates slightly, placing it in a compromising position. The solution? Don't relax in the bottom position! It's that simple. Keep everything tight and flexed and you'll have no problems.

    #2: "Squatting is dangerous to the spine"

    Again, weightlifting will only strengthen ligaments and connective tissues. If you like, you can use a weight belt when performing heavy, low rep sets, but otherwise you won't need it. Some lifters find squatting uncomfortable to the cervical spine (your neck) because of the bar resting there. Most lifters get used to it, but if you find it to be a big problem you can simply place a towel or pad underneath the bar.

    #3: "Squats are dangerous to the heart"

    Many weightlifting exercises restrict blood flow due to long periods of muscular contraction. Elevated blood pressure will result from this, but it is only temporary and isn't dangerous. The heart, just like all other muscles of the body, will adapt to the stress that is placed upon it. Therefore, squatting will help to strengthen the cardiovascular system. However, just to remain on the safe side, those with coronary diseases may want to consult a physician before beginning any kind of weight training program.

    #4: "Squats will decrease your speed"

    It is a well known and accepted fact by exercise physicists that the stronger a muscle is, the faster it will contract and the more force it can apply off the ground. Therefore, speed can only be increased through the use of squatting. I was a 100 metre sprinter in high school, and when I incorporated heavy squats into my weightlifting routine I was able to cut a full second off my time.

    Well, so much for those myths! The important thing to remember is that any negative consequences brought on by squatting are the result of improper technique and not the exercise itself. Squatting is safe and hugely effective. So if you're one of those people who fears the squat, quit being a wimp! Gather some courage and drag your ass over to the squat rack. Well, what do you say? Do you want to get huge? I mean really, really huge? Then continue reading and be prepared for some mind-blowing gains.

    Still with me? Awesome; let's learn the proper technique.

    Proper Squatting Technique

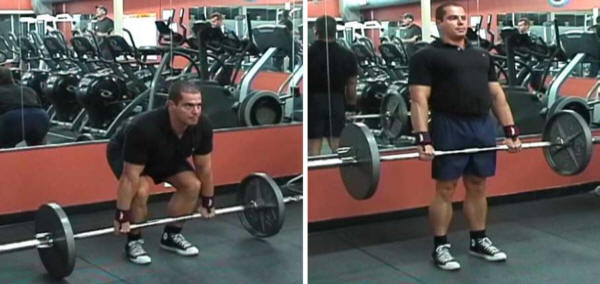
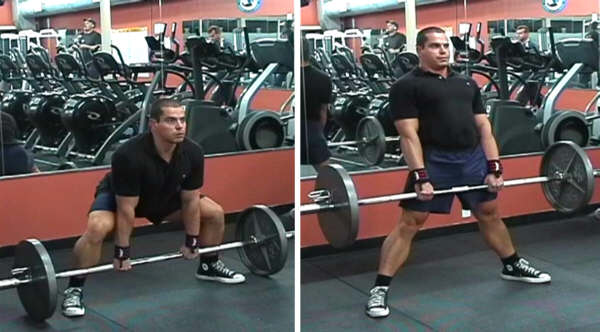
    For safety reasons you should always perform your squats in a power rack or cage. This way you can adjust the height at which you clear the bar, and you can drop the bar on the safety pins if you need to bail. The safety pins should be set at just below the depth you are squatting and the J Hooks should be set at about the level of your nipples.

    At all times during the squat your head should be pulled back, your chest raised and you should have a slight arch in your lower back. You should always be looking straight ahead, and at no time should you be leaning too far forward, or be looking up or down.

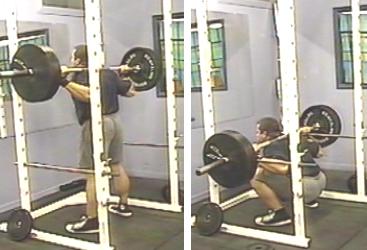
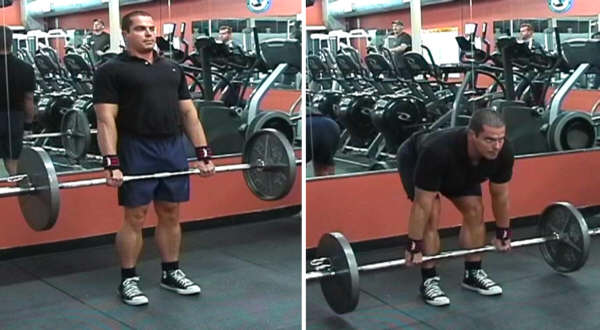
    Step up to the bar, placing your hands at about the same width as a bench press. Before clearing the bar, make sure it is placed evenly along your traps. The bar should rest on the lower portion of your traps and across your rear delts. It should almost feel as if the bar is going to roll off your back. Now that you have cleared the bar, take only as many steps back as necessary. Most squat injuries occur when backing up, so make sure that you only back up as far as you need to. Your feet should be placed about shoulder width apart or slightly wider, and they should point out at a 45-degree angle.

    Take a big, deep breath, and make your descent. You should not lower yourself straight down, but rather as if you were sitting in a chair behind you. At all times your knee must remain in line with your feet, and they should never bow in. Lower yourself until your thighs are at least parallel to the ground. If in doubt, go lower!

    As soon as you have reached the bottom position, rise up immediately. Do not relax in the bottom position! Drive up with your heels and straighten your back as quickly as possible.

    Once you are in the upright position again, take another deep breath, and continue the lift until you have completed the desired number of reps. How many reps should you perform? It depends. There are many who say that 20 rep squats are the most beneficial. Others say 12-15. Some people might use 6-8. It all depends on the person. I personally perform 5-7 reps. Experiment and see what works best for you!

    Final Thoughts

    So there you have it. You have all the reason in the world to get into the squat rack, so go ahead and do it! Everyone should be squatting! Bodybuilders, athletes, powerlifters, tap dancers.... Squats truly are the king of all exercises. When performed correctly they are not dangerous. Treat this lift with respect and you will make gains that you never thought were possible. And always remember, you ain't squat until you SQUAT!


    About The Author

    The Truth About Building Muscle


    Sean Nalewanyj is a bodybuilding expert and writer of top-selling Internet Bodybuilding E-Book: The Truth About Building Muscle.

    With The Truth About Building Muscle bodybuilding expert Sean Nalewanyj shows you how you can avoid these fatal and common pitfalls. You'll learn the honest and unbiased truth about building maximum lean muscle mass, gaining strength and burning fat. Including a complete 250-page e-book, full exercise database, and free online personal training.

    Why Your Muscle Pumps Have Nothing To Do With Your Muscle Gains

    Your back is firmly planted on the bench as you wrap your chalked hands around the cold, steel bar. Your training partner helps you un-rack the weight as you power the bar up and down, squeezing your chest and triceps on each grueling rep. You complete your 6 repetitions, re-rack the bar and stand up. Your chest feels tight and engorged with blood. You take a look in the mirror, thrilled with how full and vascular your pecs appear. You feel strong, powerful, healthy and motivated to blast through the rest of your workout with your newly achieved “pump”.

    Let’s face it, a pump feels incredible. For those of you who aren’t quite sure what I’m talking about, a pump is the feeling that you get as blood becomes trapped inside your muscle tissue as a result of resistance training. The muscles will swell up and increase in size, vascularity and tightness.

    There is certainly nothing wrong with achieving a pump in the gym, and it is simply a natural result of intense weight training. However, contrary to what the majority of weightlifters may think, a pump is in no way indicative of a successful workout. Anyone who uses the intensity of their pump as a gauge for the effectiveness of their workout is making a costly error.

    On countless occasions I've heard lifters raving about the massive pumps they get in the gym as they share methods for achieving the best pump possible. "Dude, this will give you a crazy pump!" If you have already been working out for a decent amount of time then you know exactly what I'm talking about. While a pump does feel extremely satisfying, just remember that it means very little in terms of muscle stimulation and growth.

    A pump is simply the result of extra blood within the muscle tissue. Think of it this way: if I took a pair of 10 pound dumbbells and performed 300 reps of a bench press movement, I would achieve an incredible pump. If muscle pumps meant muscle growth, then super light weight, ultra high rep programs would be the most effective way to grow. Any serious lifter with half a brain knows that this simply is not the case.

    Do you want to know how to truly gauge the success of a workout? Here it is…

    Take your workout records (in terms of weight and reps) from the previous week and compare it to the current week. Did you improve? Were you able to either increase the resistance slightly on each exercise, or perform an extra rep or two? If so, you had a successful workout, regardless of how much blood you were able to pump into your muscle tissue.

    Building muscle mass and strength is all about training with 100% intensity on every given set and then striving to improve from week to week. If you are able to consistently achieve this, your muscle size and strength will increase faster than you ever thought possible, with or without a pump.

    About The Author

    The Truth About Building Muscle


    Sean Nalewanyj is a bodybuilding expert and writer of top-selling Internet Bodybuilding E-Book: The Truth About Building Muscle.

    With The Truth About Building Muscle bodybuilding expert Sean Nalewanyj shows you how you can avoid these fatal and common pitfalls. You'll learn the honest and unbiased truth about building maximum lean muscle mass, gaining strength and burning fat. Including a complete 250-page e-book, full exercise database, and free online personal training.

    Simple GPP Workout With An Exercise Rowing Machine

    Often times strength and power athletes such as bodybuilders, powerlifters, and weight lifters focus the majority of their efforts on exercises that specifically develop size and strength and often neglect other areas of their fitness such as endurance and flexibility. I know I’ve been guilty of this in the past, especially during a heavy bulk up training phase when my main training emphasis is on getting as big and strong as possible.

    While this type of focused training may work for a while, you’ll eventually reach a point of diminishing returns. You can be as strong as an ox, but if your endurance is poor you’ll never have the work capacity to be able to apply that strength to real world situations.

    Enter GPP

    GPP stands for “General Physical Preparedness” which means your overall level of fitness. Basically it is a combination of all aspects of fitness; endurance, strength, flexibility, power, speed, and balance. By incorporating a solid GPP program into your workout routine will help expose your personal weaknesses and allow you to strengthen them and improve your overall fitness level and training performance.

    All exercise will help to some degree to improve your GPP. But chances are that if you are reading this then the majority of your workouts are based around weight training. So incorporating some forms of muscular endurance and flexibility training into your workouts may be the best way to go.

    The reality is that most people are just out of shape so basic cardio type workouts done on a treadmill, exercise bike, or elliptical are ok at first. But within the matter of weeks you’ll max out the benefits of these exercises and at that point they will not do much to improve your training performance, other then helping to burn off excess bodyfat.

    Exercise like running does improve GPP, but for a lot of folks it is just too intense and hard on the joints. For me running causes bad shin splints and a lot of heavy impact on the knees and ankles. I’m 230 lbs. and 5’6 ½ tall so I’m not exactly the poster boy for “Runners World” and I prefer to do lower impact forms of cardiovascular exercise.

    If you’ve read other articles about GPP you’ve most likely heard of sled dragging while this is a fantastic way to improve work capacity it is not always practical for those of us who train at a typical commercial gym. sled dragging

    One of my favorite cardio machines that is available at most gyms is the rowing machine (ergo-meter). This is great low for improving your GPP. It also helps to strengthen all the muscles along the posterior chain (i.e. back, glutes, and hamstrings) and is a very challanging cardiovascular workout with zero impact on the joints.

    One of the ways that I like to incorporate the rowing machine into my workouts is to do a 10 minutes before my weight training workouts and another 10 minutes after.

    rowing machine

    For the first 10 minutes before my workout I just go at a moderate pace and use this as a general warm up for my weight training workout. The second 10 minute rowing session after my weight training workout I’ll go at a higher intensity level and really push myself.

    I also like to vary the way I row to hit different muscle groups.

    • I’ll start with 1 minute doing regular rowing pulling the handle to the mid-section, this works the entire back.

    • Then I’ll go for 1 minute pulling the handle to my chest, works the middle back.

    • 1 minute pulling the handle to my chin with the elbows held high, sort of like a face pull, this targets the traps and upper back.

    • 1 minute of rowing to the mid-section with a reverse grip, this targets the lower lats more so.

    • 1 minute with a reverse grip and bicep curling the handle to my chin. This provides a great pump in the arms.

    I’ll repeat this sequence twice for a total of 10 minutes of rowing session each time.

    If you find that the resistance of the rowing machine is not hard enough, you can attach a rubber fitness band to the machine and wrap it around the rowing handle to provide additional resistance.

    Flexibility

    To improve flexibility I will perform a couple stretches for each bodypart that I worked during my weight training workout. This is something that is so simple to do, but most people just ignore it. One of the benefits of stretching directly after a bodypart is trained is better recuperation, recovery, and improved muscle growth through fascial stretching.

    stretching

    I like to hold each stretch for at least 30-60 seconds in order to really get the benefit of the stretch. Simply doing a quick 5-10 second stretch is not good enough to improve flexibility to any great degree.

    Also take your time with stretching, don’t do too much too soon. Were not trying to compete with yoga masters here, just trying to improve mobility, speed up recovery and muscle growth.

    Incorporating these simple GPP exercises into your workouts doesn’t take much time, but the benefits are tremendous. Instead of being the stereotypical muscle-bound bodybuilder, you can be strong, fit, and agile.

    Deadlifts - The best exercise for building a thick powerful muscular body.

    There was a day when bodybuilders were characterized by thick massive torsos, tumbling traps, and sweeping lats that hung like boxcar doors from broad-beamed shoulders. All this came about from slapping as many iron plates as possible onto a barbell and dead lifting it off the ground in whatever manner it took to get the weight up.

    The deadlift is the oldest of all weight training exercises and is one of the most effective exercises for overall body development. Deadlifts are not pretty and neither are the men who hoisted them, but this movement made their physiques the biggest, thickest, and strongest in the world.

    The deadlift is a compound movement that works all of the major muscles in the body, with most of emphasis on the traps, spinal erectors, hips, glutes, and hamstrings. The remaining muscles are involved in stability control.

    It is the purest single test of strength because it is one of the few lifts where you lift a dead weight off the ground. In most other lifts the weight changes direction or starts from the top position and you can use reverseal strength and momentum to rebound and assist in lifting the weight, as in the squat and bench press.

    In this article I'm going to cover three different variations of the deadlift as well as an effective 7 week deadlift training cycle that you can use to help sky rocket your deadlift poundages and pack on slabs of thick dense muscle mass on your frame.


    Regular Conventional Deadlift

    Close Stance Conventional Deadlift

    Stand in front of a barbell with your shins close to the bar. Feet shoulder width apart or closer. Grab the bar with your hands outside your legs, a bit wider then shoulder width. Keeping your arms straight, bend your legs and flatten your back. Position yourself so it is like you are doing a squat with the barbell at arms length in front of you.

    Pull the barbell off the floor by straightening your legs and torso until your body is completely erect. Pull your shoulders back. Then lower the bar back to the floor.


    Sumo Deadlift

    Wide Stance Sumo Deadlift

    The Sumo deadlift is a variation of the deadlift whereby the legs are spread far apart to the sides, mimicking the stance of a sumo wrestler. This variation changes the emphasis of the lift and places more work on the hips and legs and a bit less work on the back. Depending on your build the sumo deadlift may be easier to perform then the conventional deadlift.

    When doing the sumo deadlift, rather then focusing on pulling the weight up, focus on keeping your knees out wide and pushing your feet out to the sides as if you are trying to spread the floor apart with your feet. At the same time bring your hips forward. This will improve your leverage and allow you lift more weight.


    Romanian deadlift (aka Stiff Leg Deadlift)

    Romanian Deadlift

    The Romanian deadlift variation places most of the emphasis on the hamstrings and lower back. This variation is better suited for higher reps and lighter weights then the conventional and sumo deadlifts. The legs are kept almost straight through the movement, with just a slight bend in the knees to take stress off the tendons.

    You can start with a regular convetional deadlift to get the weight up. Then just bend over at the waist until you feel good stretch in the hamstrings and then staighten back up. Don't let the bar touch the floor in between repititions. This will keep constant tension on the muscles at all times during the Romanian deadlift.


    Deadlift Training Tips

    For a lot of people the grip is the weak link in the deadlift. If your hands are not strong enough to hold onto the bar, then the weight will not go up, regardless of how strong you are in the back, hips and legs.

    Weight Lifting Chalk To help increase your grip try using lifting chalk on your hands. Lifting chalk is just magnesium carbonate and it is actually good for the hands. Chalk will dry up sweat and increase friction between your hands and the bar. It comes is small blocks and is available at most sports stores for less then $10. I keep a block of lifting chalk in my gym bag at all times. I store it in a small Tupperware container and use it for most all free weight exercises, especially deadlifts.

    Another grip tip that helps the deadlift tremendously is using a mixed or alternate grip when lifting heavy weights. This is simply holding the barbell with one hand facing forwards and the other hand facing backwards. The advantage of this grip is that as the bar is rolling out of one hand, it is also rolling into the other hand. Thus allowing you to hold onto heavier weights then you could with a regular overhand grip. I personally like to switch back and forth with the hand positions for each set to ensure equal development over the long term. Alternate Grip For Deadlifting

    A good weight lifting belt should be worn on your heavy sets. The purpose of a belt is to provide protection, support, and stability for the entire mid-section, especially the lower back. Do not wear the belt for lighter warm up sets. Rather save it for your top weight sets when you need it most. Overuse of a weight lifting belt may actually weaken the muscles of the mid-section because of the constant support, the muscles will not get a chance to be worked like the rest of the body.

    Powerlifting Belt The best belts are the thick powerlifting style belts that are just as wide in the front as they are in the back. This allows you to push your stomach against the belt and provide more support for the lower back. I suggest you avoid the thin weight lifting belts that are common in most department stores.

    When you deadlift you should wear flat thin soled sneakers. This will keep your body in proper alignment to lift and keep your feet as close to the ground as possible. If you wear thicker soled sneakers this will increase distance that you have to pull the bar. It may not sound like much, but that extra inch of cushioning could take several pounds off your max deadlift. My personal favorite sneakers are Chuck Taylor Converse, these are one of the best lifting sneakers that I've ever worn. They are totally flat and provide good grip and ankle support.


    Deadlift Workout

    One of the best ways to improve your deadlift strength is to perform multiple sets of single reps. Here is a sample 7 week deadlift cycle to help increase your deadlift 1 rep max. I've used this cycle several times with great results each time. With each lift focus on pulling the weights as fast and explosively as possible. The faster you lift the weight, the more stress you'll apply to the muscles, and the stronger you'll become.

    7 Week Deadlift Cycle

    The weights are based on a percentage of your current 1 rep max.

    • Week one: 70% - 15 sets of 1 - rest one minute between sets
    • Week two: 75% - 12 sets of 1 - rest one minute between sets
    • Week three: 80% - 10 sets of 1 - rest 90 seconds between sets
    • Week four: 85% - 6 sets of 1 - rest 90 seconds between sets
    • Week five: 90% - 3 sets of 1 - rest two minutes between sets
    • Week six: Rest (no deadlifting)
    • Week seven: try for a new max deadlift. Rest as long as you need in between sets (i.e. 3+ minutes)

    Note: You can use this 7 week deadlift cycle for either the sumo or conventional deadlift. Do Not use this routine for the Romanian Deadlift, for this exercise it is best to use lower sets and do multiple reps (i.e. 3 sets of 10-20 reps).

    To show an example with some real numbers, lets assume the lifter has a 1 rep max of 405 lbs.

    Week one: 15 sets of 1 rep with 285 lbs.

    Week two: 12 sets of 1 rep with 305 lbs.

    Week three: 10 sets of 1 rep with 325 lbs.

    Week four: 6 sets of 1 rep with 345 lbs.

    Week five: 3 sets of 1 rep with 365 lbs.

    Week six: rest

    Week seven: work up to a new 1 rep max...

    To pyramid up to a new 1 rep max the weights should go like this:
    135 lbs.
    185 lbs.
    225 lbs.
    315 lbs.
    365 lbs.
    405 lbs.
    425 lbs.
    Each set after this, add approx. 5-10 lbs. to the bar until you reach your 1 rep max.

    Most folks who are used to bodybuilding type workouts will probably be quite surprised by the idea of doing multiple sets of single reps. But this is one of the most effective ways to develop strength and power. Obviously you will not be pumping out reps until failure, but rather you'll be explosive and feel strong and powerful with each single rep set. Generally, after the first few sets you'll actually feel stronger and be able to pull the bar up harder and faster. This is due to getting comfortable with the exercise and getting into your individual groove where your body position feels strongest.

    By using the training tips and suggestions covered in this article, and following the 7 week deadlift workout cycle you should have no problem blowing past your personal deadlift 1 rep max.


    Instructional Deadlift Video Clip Taken From The

    Total Fitness Bodybuilding DVD Training System.


    Click the Play button to watch the video clip

    (make sure your computer speakers are turned on)

     
    Design by Free WordPress Themes | Bloggerized by Lasantha - Premium Blogger Themes